
Soy Maria Elena, mi blog se llama ARAÑA TEJE TEJE..me gusta tejer, las manualidades y amo a Ricardo Arjona. me di el gustazo de que me cante señora de las cuatro decadas al oido, elegida entre 5 mil mujeres.. Con respecto a las imágenes que no son mías y que utilizo en el blog, siempre trato de citar la fuente original pero no siempre la encuentro. Si conocen o son la fuente de alguna de las imágenes, me pueden enviar un mail y yo me ocupare de poner el enlace como corresponde Gracias!
miércoles, 24 de octubre de 2012


martes, 23 de octubre de 2012

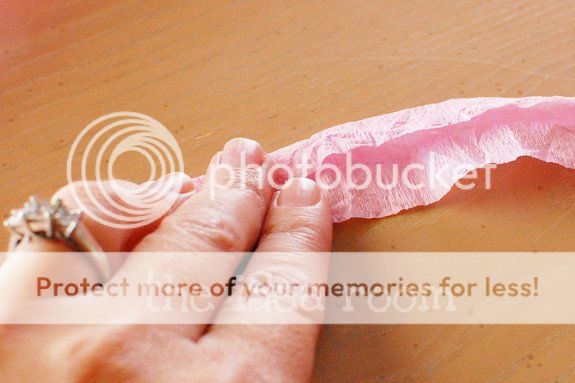
bolsas para regalos con blondas y papel de diario

estas lindas bolsas tan femeninas son facilisimas de hacer. si no te gusta el papale periodico puedes elegir un papel barrilete del color que combine con todo lo demas ( torta, globos, etc..)
 | ||||||||
- papel de diario o barrilete si quieren en color liso - Ribbon Cable - Pegamento y tijeras - Papel de encaje de patrones platos redondos |
Paso 1:
- Cortar el papel en hojas rectangulares y luego doblar el aviso de bordes en el centro como se muestra.

Paso 2:
- Utilice pegamento fijo superponiendo los bordes del papel.

Paso 3:
- Doblar la cabeza 5 cm en la parte inferior de la bolsa.

Paso 4:
- ¿Ha cerrado el borde 2 corto y continuar a pegar más de 2 bordes largos de forma similar para formar el fondo de las bolsas!
Paso 5:
- Espere a que el pegamento se seque, utilice sus manos para abrir la bolsa inflada.

Paso 6:
- Ahora ponemos los regalos dentro de la bolsa de mí!

Paso 7:
- Doble los restantes 2 cm en los bordes para formar la boca de la bolsa.

Paso 8:
- Doble plato cubierto con papel y cinta adhesiva sobre la boca de la bolsa.

Paso 9:
 - Por último, inserte la cinta y haga un pequeño miño de lazo y listo
 genial!!
 Contiene pequeños regalos adentro es todo lo que está siempre en casa!


lunes, 22 de octubre de 2012
Una letra vintage usando lana.

Tutorial, Paso a paso:
Lo que he necesitado para este proyecto han sido: caja de cereales, tejeras, lana de un color y pegamento
Paso 1: Imprimir la letra en el tamaño e forma deseada
Paso 2: Cortar la letra en la caja de cereales.
Paso 3: Empezar a envolver la letra con la laña (recomiendo un hilo groso)
Paso 4: Despues de envolver hasta que se quede todo el carton cobierto, pegar por detras la punta del hilo y ya esta!!
fuente: http://sofiaparapluie.blogspot.com
sábado, 20 de octubre de 2012

ADORNO DE JAULA DE PAJARITOS
CREDITOS : http://www.colorparty.com.br/search/label/batizado

String or crochet thread
Double-sided tape
Plastic lids (ice cream pint lids work great!)
Small brads
Small hole punch
Paper cutter or straight edge and X-acto knife
Scissors


Instructions:
1. Begin by cutting 12" x 1/4" strips of paper with your paper cutter or straight edge and X-acto knife. You will need four strips per bird cage. (see image A)
2. In the center of each paper strip, punch a tiny hole with your hole punch. Set aside. (see image B)


10. Wrap the strip around the tape-coverd edge of the lid. Press down and smooth with your fingers. (see image K)

Create several lanterns to display. Hang them in a tree or from large branches in a vase.
What You'll Need:
An assortment of patterned and colored card stockString or crochet thread
Double-sided tape
Plastic lids (ice cream pint lids work great!)
Small brads
Small hole punch
Paper cutter or straight edge and X-acto knife
Scissors
Instructions:
1. Begin by cutting 12" x 1/4" strips of paper with your paper cutter or straight edge and X-acto knife. You will need four strips per bird cage. (see image A)
2. In the center of each paper strip, punch a tiny hole with your hole punch. Set aside. (see image B)
| 3.
Download your bird template and print it out on heavy card stock. Cut
out the bird, and trace around it on one of papers. Cut out your bird,
and punch a hole in the center of it's back. (see image C)....Click HERE to download your template. 4. Cut a 14" length of string. Tie your bird to the end of the string, and the tie a not in the string 1.5" above the bird. (see image D) 5. Thread the string through the holes in your four paper strips. Slide them down the string until they meet the knot. (see image E) 6. Secure the strips together (just above the knot) by running a small brad through the holes. (see image F) |
| 7. Run a strip of double-faced tape around the edge of the lid. (see image G) 8. Take your bundled strips, and fan them out like a starburst. Stick the ends of the strips to the edge of the lid, keeping them evenly spaced. (see images H, I and J) 9. Cut a strip of card stock 1.5 inches wide and long enough to wrap around the lid diameter. If your lid diameter is greater than the width of your paper, cut two strips. |
10. Wrap the strip around the tape-coverd edge of the lid. Press down and smooth with your fingers. (see image K)
Create several lanterns to display. Hang them in a tree or from large branches in a vase.
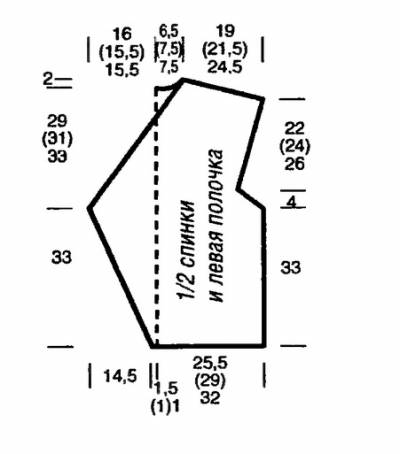
chalecos rusos con patron sin explicacion
como siempre las rusas se pasan con sus diseños y sus tejidos... ellas y las japonesas me parece que son lo más en ese tema. estos modelos traen aparte de la foto y el molde una explicacion en ruso, pero las que somo expertas tejedoras solo necesitamos el esquema para darnos idea, lo demas es "maña"...





Suscribirse a:
Entradas (Atom)